Quick Start Guide
WalletConnect is a powerful protocol that allows you to connect your Unity game with various mobile wallet-supported decentralized applications (dApps) on the blockchain. This integration enables players to interact with blockchain assets, perform transactions, and access various blockchain features within your game. In this documentation, we will guide you through the process of integrating WalletConnect into your Unity project.
Prerequisites
Before you get started with WalletConnect in Unity, make sure you have the following prerequisites in place:
-
Unity: Ensure that you have Unity installed on your development machine. You can download Unity from the official Unity website.
-
Eidolon.Unity SDK: You can obtain the Eidolon.Unity SDK package by clicking here. The SDK package contains all the necessary components to get started with blockchain integration in your Unity project.
Getting Started
1. Configure Your Wallet
In order to use WalletConnect within your Unity project, you first need to configure it. Luckily we’ve made this extremely easy through our Wallet Connect editor tool found directly under Eidolon in your Unity editor!
- After downloading the extension package, drag and drop it anywhere in your Unity assets to import the files.
- At the top of your editor, click on
Ēidolonand then onWallet Connect. This should open the window you see below.
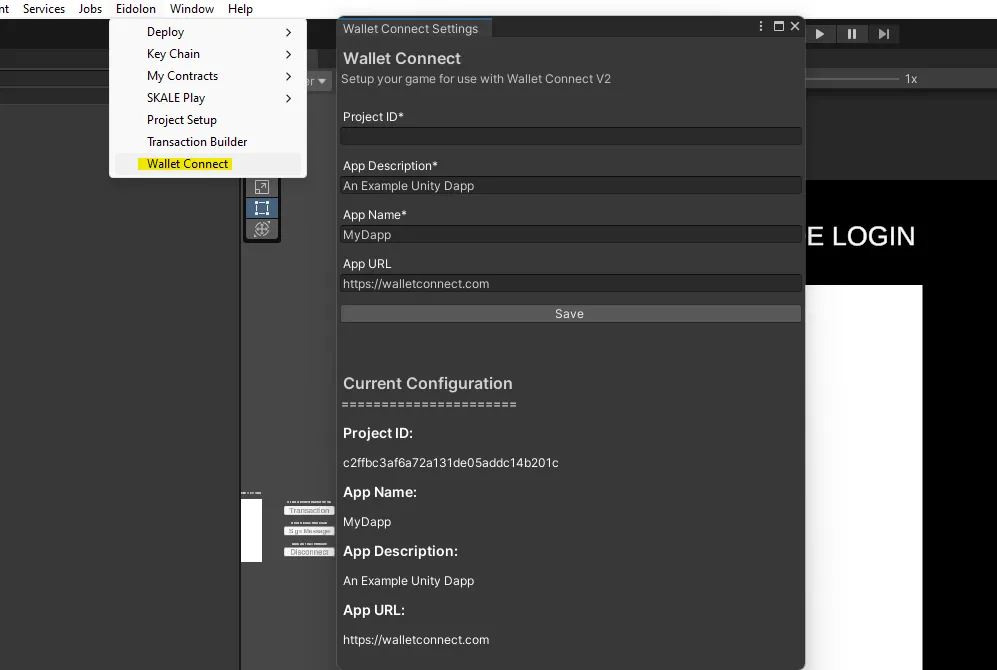
In here you’ll be able to configure the following:
Project ID- This is your Wallet Connect Project ID which can created on their official website.App Description- Your project Description.App Name- Your project Name.App URL(optional) - Your Project URL. Wallet Connect can use it for added authentication.
After filling our the required fields and saving your configuration, you’ll be ready to use wallet connect in your Unity project.
Next, let’s look at some example Usage:
2. Connect Players To Your Game
WalletConnect allows mobile wallet dApps to connect players to your Unity game, you can achieve this by doing the following:
-
Create a new Unity C# script for use in your game scene.
-
Declare new
WalletConnectWalletandRawImagevariables.private WalletConnectWallet wallet;public RawImage qrCode; -
Next, let’s instantiate an instance of our wallet for use in-game.
private void Awake(){// Instantiate our wallet using a default configuration that will use the chain we set in our project setup.wallet = new WalletConnectWallet();}private void Awake(){// Note you can overload the default constructor with an array of chains, RPC methods and eventsstring[] chains = { "1" };string[] methods = { "personal_sign" };string[] events = { "chainChanged" };wallet = new WalletConnectWallet(chains, methods, events);} -
After we’ve instantiated our wallet, we can generate a new QR code for players to scan and connect to. Players can scan this QR code to connect their preferred mobile wallets to the current game session.
private async void Start(){// Initialize our wallet and generate the QR Code datastring rawQrCodeData = await wallet.Initialize();// Generate and show the QR Code TextureqrCode.texture = await wallet.GenerateQRCodeImage(rawQrCodeData);// Wait for the player to connect and assign their public address to a variablestring account = await wallet.AwaitAuthentication();// Optional - Set the account to PlayerPrefsPlayerPrefs.SetString("Account", account);// Display the connected accountDebug.Log("Connected Account: " + PlayerPrefs.GetString("Account"));}A new QR code should render on your
RawImage. You can use your phone to connect to the game through any Wallet Connect enabled wallet; likeTrust WalletorMetaMask Mobile.
-
Create a new Unity C# script for use in your game scene.
-
Declare a new
WalletConnectWalletvariable.private WalletConnectWallet wallet; -
Next, let’s instantiate an instance of our wallet for use in-game.
private void Awake(){// Instantiate our wallet using a default configuration that will use the chain we set in our project setup.wallet = new WalletConnectWallet();}private void Awake(){// Note you can overload the default constructor with an array of chains, RPC methods and eventsstring[] chains = { "1" };string[] methods = { "personal_sign" };string[] events = { "chainChanged" };wallet = new WalletConnectWallet(chains, methods, events);} -
After we’ve instantiated our wallet, we can create the logic required to connect a user to our mobile game. You can use a button, or invoke the below at any point where you need it.
private async void Start(){// Initialize our wallet and generate the QR Code datastring mobileLink = await wallet.Initialize();// Open the URI with the users preferred wallet dAppApplication.OpenURL(mobileLink);// Wait for the player to connect and assign their public address to a variablestring account = await wallet.AwaitAuthentication();// Optional - Set the account to PlayerPrefsPlayerPrefs.SetString("Account", account);// Display the connected accountDebug.Log("Connected Account: " + PlayerPrefs.GetString("Account"));}
3. Send a Transaction
Now that we have a connection between our wallet and the game, let’s have a look at how Wallet Connect ties into the Smart Contract class to send transactions.
    // Declare our smart contract variable    SmartContract myContract;
    // Declare our wallet variable    WalletConnectWallet wallet;
    private void Awake()    {        // Instantiate our wallet        wallet = new WalletConnectWallet();
        // Instantiate our Smart Contract        myContract = new SmartContract("ContractAddress", "ContractABI", wallet);    }
    // An example transaction for use with WalletConnect    public async void ExampleSendTransaction()    {        // Contract Method        string methodName = "setValue";        BigInteger amount = 100;
        // Who is sending this transaction?        string fromAddress = 0x00SomeWalletOrContractAddress
        // Method Arguments        object[] arguments = new object[] {            amount        };
        try        {            // And then we send the transaction and await the transaction hash            string hash = await myContract.SendTransaction(methodName, parameters: arguments);
            // Display the Transaction hash            Debug.Log("Transaction hash: " + hash);        }        catch (System.Exception e)        {            Debug.Log(e);        }    }
4. Sign a message
If you need a player to sign a message, you can send a request to their wallet using the below:
    // An example function to have the connected user sign a message    public async void SignMessage()    {        string response = await wallet.SignMessage("Please sign this test message");
        Debug.Log("Response: " + response);    }
5. Disconnect a Player
Once the session is done or you’d like to disconnect your player, you can simply do the below:
    public async void Disconnect()    {        // Disconnect the user        bool disconnected = await wallet.Disconnect();
        if (disconnected)        {            Debug.Log("Disconnected");        }        else        {            Debug.Log("Failed to disconnect");        }    }
Conclusion
WalletConnect integration in Unity opens up a world of possibilities for your game by allowing players to interact with blockchain assets and dApps seamlessly. By following this documentation and referring to the example scene built into the package, you should be able to your game blockchain ready in no time!
Happy developing!